
3. AuditPro Mobile Scanning Device Features and Functions
3.1 AuditPro Mobile Scanning Device Features
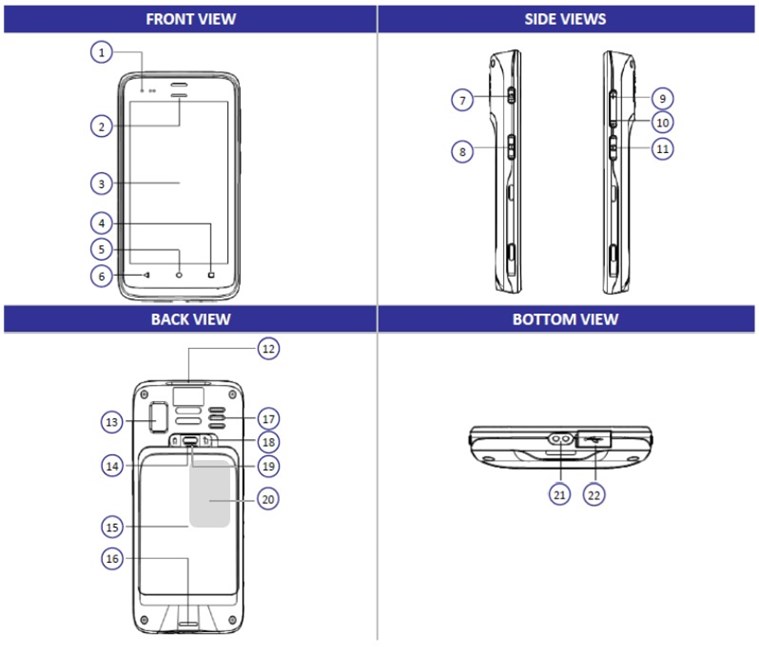
| 1 | Power Indicator | 12 | Scan Engine |
| 2 | Scan Indicator | 13 | Camera |
| 3 | Display | 14 | Battery Cover Buckle Handle |
| 4 | Function Key | 15 | Cattery Cover |
| 5 | Home Key | 16 | String Buckle |
| 6 | Return Key | 17 | Speaker |
| 7 | Power Button | 18 | Battery Cover Safety Lock |
| 8 | Scan Button | 19 | Battery Cover Safety Button |
| 9 | Volume Up | 20 | RFID Reading Area |
| 10 | Volume Down | 21 | Charging Contact |
| 11 | Scan Button | 22 | USB Cover |
3.2 AuditPro Mobile Scanning Device Power button
To turn on:
1. Press and hold the Power button for approximately 3 seconds
To turn off:
1. Press and hold the Power button until the options menu appears.
2. Touch Power Off.
3.3 Scan button/ engine
Press and hold left or right Scan button and point the scan engine to the barcode.
3.4 Front Camera
When logging a procedure using the Scan Text Method, the front camera will be enabled to capture the text for reading.
3.5 Probe Tag and trophon2 Operator Card (RFID) Reader
Press and hold probe tag or trophon2 Operator Card against the reader area.
3.6 Home Key
Press the home key button to navigate to the device home screen.
3.7 Access PIN
The screen is locked after powering on the device and after 2 min of inactive user activity.
Default PIN
Use the default PIN 1234 to unlock the screen. It is recommended to change it during the 1st use.
Change PIN
Navigate to the Device home screen>Settings>Screen Lock> Re-enter your PIN >PIN>Enter new PIN>Re-enter the new PIN>OK
Forgot PIN
Contact NAN to reset.
| Warning. The mobile scanning device must be networked at reset, otherwise any unsynced procedures will be deleted. |
3.8 Clean device
Use trophon2 Companion Cleaning Wipes to clean all accessible surfaces (except the charging contacts) of the mobile scanning device as required, until visibly clean.
See the following link for additional approved cleaning solutions: https://sps.honeywell.com/us/en/support/blog/productivity/honeywell-disinfectant-ready-housing-cleaning-and-disinfecting-guide